
An Aisling's Guide to the Arena
Who am I? What is Arena?
Hello there, I am Confidence, an Arena Host of the Coliseum Arena. I spend my days battling other Aislings to pass the time, but for now, let us discover how it all came about.
There was a time when Aislings would use the ascension mask to battle one another, begging King Bruce for an area dedicated to such a sport. From what I've gathered, The Coliseum Arena was built by King Bruce himself, estimated between Deoch 12 and Deoch 16. When the arena was constructed, King Bruce had placed the Mundanes ColiseumTar and his twin brothers ColiseumTer, ColiseumTir, ColiseumTor, ColiseumTur, and ColiseumTyr, in charge of managing the arena.
Later on, around Deoch 17, the mundanes chose Aislings to run the Arena as Arena Host, with one being the Master Host.
The Coliseum Arena you witness today was never repaired after the attack by Dark Aislings. It continues to look similar to Chadul's Realm. I will show you my memories of it from before the attack later on.
Furthering through, you will find detailed information about this plot of land between Piet and Loures Castle. Be careful, as all players are not your friends here.
Coliseum Arena
How do I get there?
To access the Coliseum Arena, you must travel from Pravat Cave, Loures Castle, or Loures Harbor. Other places in the vicinity of the Coliseum do not allow you to travel there. The first area you will encounter is the Coliseum Threshold.

Coliseum Threshold
The Coliseum Threshold is a vital part of the Coliseum Arena. Its main purpose is to keep Aislings who have broken the rules and were banished or exiled, as well as those who have not reached their 10th Insight, from entering. It serves primarily as a filter for justice, as every potential combatant and spectator must pass through this threshold to enter the Coliseum Arena. After you pass through the Threshold, you will find yourself in the Coliseum Entrance.
Coliseum Entrance
Coliseum Entrance is where you'll find ColiseumTir. He will guide you to where you wish to go.
Your options are:
-
Loures Battle Ring
-
Coliseum Gauntlet
-
Team Arena
There are two boards. The one on the left is the Public Arena Board, anyone may post on this board about Arena related content. The one the right is the Coliseum Arena Board, the Arena Host Team posts upcoming events, arena rules, and advice to players visiting the Coliseum Arena. It is important that you check the Coliseum Arena Board for most up-to-date rules before entering any part of the Coliseum Arena.

To Team Arena
To Coliseum Gauntlet
Exit
To Loures Battle Ring
Loures Battle Ring

North
West
Inner
East
South

Loures Battle Ring is one giant map divided into two areas, Outer and Inner. Outer consists of four areas shown above, north, south, east, and west. Inner also consists of inner north, inner south, inner east, and inner west. Fighters can reach any corner of Loures Battle Ring by talking to one of the sisters, Bastill, Bastilli, Bastille, and Bastilla, shown below. There are rules every Aisling must follow when it comes to participating in the arena, which are created by the Arena Host Team to keep a fair playing field for everyone. These rules can be found on the Coliseum Arena board located in the Coliseum Entrance.
When you speak to Bastille or any of the other sisters, she will help you repair your gear, withdraw and deposit from the bank, or guide you to inner or outer parts of the Loures Battle Ring. Having her escort you into the inner parts of the arena is a little more complicated than outer. She will ask if you'd like to become a spectator or combatant. Choosing spectator will cause you to lose your body and become a ghost so that you can not interfere with the living while choosing combatant will keep you alive. Either way, she will then allow you to choose which part of Inner you'd like to go to.
If you are an Arena Host, she will guide you around different parts of the entire Coliseum Arena, and assist you in banishing or forgiving players. (Coliseum Order)
By selecting Outer Battle Ring, she will ask you which corner you'd like to go to. Simply select a direction, and she will escort you there immediately. To leave the Loures Battle Ring, select "Leave Battle Ring" and you will venture back to Mileth Threshold.
Coliseum Gauntlet
In the Loures Battle Ring, it is up to the players who is their team and who is their enemy. You can build your own factions and decide whom you wish to keep out. The way we currently see the arena are two sides, the guild that has the most players who can keep the arena vs anti (usually a group of people from separate guilds, fighting the bigger guild.) You could join either side or create a brand new one!
The Coliseum Gauntlet is the pathway into Hosted Battles. Hosted Battles are team based player vs player matches controlled by a member of the Arena Host Team. An arena host will balance the teams of fighters against one another, set the objective of the match, and define the rules of the battle. If an Aisling breaks of any of the rules, the host can have them removed from the battle. If you think you have what it takes, become a combatant, and join in on the fun!
To reach the Coliseum Gauntlet, you will need the assistance of ColiseumTir in the Coliseum Entrance. When you speak to him, mention Arena Entrance, then tell him whether you'd like to be a combatant or spectator. He will also escort you out of the arena and explain how to become an arena host if you ask him to.

Talk to ColiseumTir about Arena Entrance to be escorted to the Coliseum Gauntlet.

Spectator
Arena Host
Combatant
Since this is known as "Chadul's Arena", the statues of the Aislings who broke the Temuairian Seal are placed in the Coliseum Gauntlet. You can find more information about the statues in Loures Harbor.
What a great inspiration to battle!
The board next to the statues reads:

Hosted Battles
There are two types of Hosted Battles, one is known as Arena and the other is Balanced Arena. Let's discuss Arena first.
In the Arena, it is similar to Loures Battle Ring. Players aren't limited by anything except for the host's rules and objectives. This allows Aislings to keep their health, mana, and items. As Aislings grew, the gap between new and old Aislings became wide and many had lost interest in fighting an uphill battle.
That's when King Bruce had enough of the abuse of older Aislings, torturing younger members of the community, and decided that a balanced arena should exist. Older Aislings are reduced to 250,000 health points, and 150,000 mana points while newer players gain health and mana to bring them to the same amount, hence the word "Balanced." King Bruce hoped this would put competitors on a more even battlefield. In the Balanced Arena, combatants are not allowed to use their light necklaces or lumen amulets when battling, and you must deposit them before you are allowed to enter the Balanced Coliseum Underground.
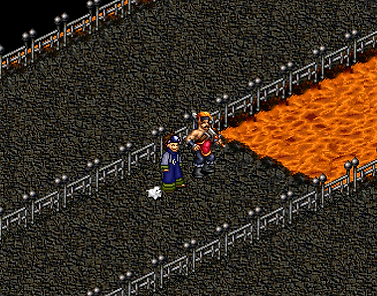
Above you'll see the Underground. When the host is ready, he or she will escort everyone in the Coliseum Gauntlet to the Coliseum Underground. Depending on whether it is a balanced match or not, the name of the location will be different, however, the area will look exactly the same. For Arena, the name is "Coliseum Underground", and for Balanced Arena the name is "Balanced Coliseum Underground". Regardless, the map functions the same. However, ColiseumTyr is located in Coliseum Underground and allows Aislings to access the bank, repair, and resurrect a little differently than ColiseumTar in Balanced Coliseum Underground. ColiseumTar does not offer banking or repairing, and his resurrecting is a little different, to reach this option you must be in the spirit world.
In the Underground, the Arena Host will divide you into teams. Depending on where a combatant is placed, their hair will change to that color to indicate that they are part of that team. The host will open the gates when the match is ready to begin, and fighters may enter the Arena. Once inside, wait for the Arena Host to call go!
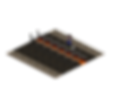
Below, you can see the Arena map, which shows four sides and a carpet in the middle. Again, the map is not different based on whether you're in the Arena or the Balanced Arena. It is, once again, the same except for the name; they are "Coliseum Arena" for Arena, and "Balanced Coliseum Arena" for the Balanced Arena. Depending on the team, participants will enter the Arena on different sides.
It is the decision of the Arena Host which team you will find yourself on.

Green Team
Blue Team
Gold Team
Red Team

Green Team
Spawn
Blue Team
Spawn
Gold Team
Spawn
Red Team
Spawn
Rewards
After you finish a Hosted Battle, an Arena Team host will deem a winner. You will gain a legend mark for participating and another for winning, and a nice chunk of experience.
The winning team will receive 500,000,000 experience and 375,000 ability points, whereas the losing teams will receive 250,000,000 experience and 187,500 ability points.
Arena Host Team is allowed to give away prizes that are usually generated at random, but sometimes it's based on who did the best in the battle. Arena Host Bags are the main prize Arena Hosts are able to create using their trinket.
Arena Host Bags can be opened three different ways:
Andor Chest
Andor Queen Chest
Water Dungeon Chest
Satchel of Goods
Arcella's Stolen Bag
LA Raffle (x2)
Ability and Experience Box 1
Ability and Experience Box 2
Ability and Experience Gift 1
Ability and Experience Gift 2
Double EXP/AP Bonus
Experience Gem

100,000,000 - 300,000,000 Experience

100,000,000 - 300,000,000 Ability
5,000,000 - 10,000,000 Gold
Other Arenas
There are more arenas where players can fight one another.
-
Pit Arena (only for warriors, must travel from Abel port to the Coast, and go into the Coast Bar)
-
Grand Coliseum (located in Gladiator Arena, also known as Med arena)
-
Team Arena (explained further below.)
-
Balanced Arena (explained further below)
This is the Pit Arena map, to get here you must enter the Coast Bar and say "Honor Field (your level)", your opponent must be within 3 levels of you. This arena is not normal as it will send you to sgrios when you die. You must then wait until your opponent brings you back from Sgrios, do not talk to Sgrios.
If you leave this arena, without dying, you will never be allowed
to enter again.


This is the Grand Coliseum Map, you can reach this map by going to Gladiator Arena in Medenia. Talk to Yen about Gladiator Entrance, choose Combatant or Spectator, then The Grand Coliseum. Speak to Fina when you wish to leave, if you die you will be resurrected when you exit the arena.
The Pit and The Prairie are similar to the Coliseum Gauntlet,
these areas are where you would wait for a host to start
hosted battles. Unlike the Coliseum Arena in Temuair,
the battles here are one round matches, as the
combatants are not allowed to return to the
preparation room. (Underground)
If you win, speak to the Monitor. you will be able to resurrect your opponent and leave the arena. He will grant you 500,000 experience and a legend mark.
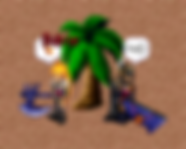
Team Arena
This is the area where you meet up to play in a Team Arena match. Teams will automatically balance themselves by allowing or denying you to join a team. The Team Arena has two different matches going at all times. The left side will bring you to Team Arena 1, and the right side will bring you to Team Arena 2. Matches are ten minutes long. Every match is automatically posted on the correct board, displaying a team's points by the player and showing which team won the match. There must be at least ten players in the match for the match to count.

Water Team
1
Fire Team
1
Water Team 2
Fire Team
2
Team Arena Map 2
Team Arena Map 1
Exit
This is the Team Arena, the goal is to accumulate points. The most points will win the game, there is no point cap or goal to reach.
The point system in Team Arena is very easy, to gain points you can:
-
Kill Enemy Players - one point
-
Control Point - one point per twenty-seven seconds (that is per control point, a total of three control points on the map)
The Control Points will damage you for 2% of your base health points per second if you do not control it. If you are killed by a control point, it will grant the enemy team a point. Attacking your own control point will kill you and also grant the enemy a point. Control Points have elemental defenses that are randomly generated when the match starts. A good technique for basher classes is to carry all four elemental necklaces with you. (Sea > Fire > Wind > Earth). Having a teammate who can check the Control Point's defense is an easy way to kill Control Points quickly.
Upon death, you become a ghost and transported to the death area. Respawn time in the Team Arena is thirty seconds.
You will spawn at the top or bottom of the map depending on whether you are fire or water team. When you respawn, there's a mundane named TeamCaster and if you say out loud "aite" or "fas" he will cast the spells "Team Arena Aite" and "Team Arena Fas" on you, respectively. You will also resurrect with Arena Stealth cast on you, a brief hide.
If you leave a team arena match during a battle, a twenty-minute penalty for leaving will be applied next time you try to re-enter the team arena.

Water Team Spawn
Water Team Death Area
Fire Team Death Area
Fire Team Spawn
Rewards
Team Arena has its own reward system through ColiseumTir in Arena Entrance. To redeem your wins, speak to him.


Champion Medal - 200 Wins and 10,000,000 coins
Contender Medal - 150 Wins and 5,000,000 coins
Battle Medal - 100 Wins and 2,000,000 coins
Fighter Medal - 50 Wins and 1,000,000 coins
The bonuses from the medals are unknown as no one has completed all 200 wins before. The first medal, "Fighter Medal," is said to give 150 health and 150 mana, but I was unable to determine the accuracy of the rumor. Medals are equipped in the accessories slot.
Balanced Arena

The Balanced Arena is located in Pravat Cave; speak to Celesta to be escorted in. Before entering, you must be at least level 75. Light necklaces and lumen amulets are not allowed into the Balanced Arena, so be sure to deposit them before attempting to enter. Once inside, your health and mana are balanced at 250,000 and 150,000 bases. Celeste can repair your equipment and escort you back outside. If you die, speak to Celeste to exit and you will be resurrected, there will be a minute wait time before entering again even if you did not die.
The player vs. player aspect of this arena is currently disabled due to events such as Capture the Fowl and Mech Invasion. However, it can be re-enabled by higher powers should the occasion arise.


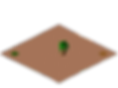
Above is the Balanced Arena map; the circled area is where Celesta will escort you onto the map.
This map is under the jurisdiction of the Arena Host meaning arena rules do apply here.
Arena Knowledge
“Knowledge has a beginning but no end.” ― ((Geeta S. Iyengar))
In this section, I will be going over the arena basics and what you should know before entering the arena. These topics will improve your skills: War Tactics and Terms & Abbreviations.
In War Tactics, you will learn about different ways to apply those terms and a bit of extra knowledge that doesn't come easy to everyone. These tactics will surely improve your player vs. player skills.
In the Terms & Abbreviations, you will find common uses of terms and abbreviations every player should know, which is very useful for boosting your arena lingo and saving you or your teammate's life.
.png)
War Tactics
In this section, I will give you some tactics and what to look out for in duels, big battles, or hosted battles. Some players just have a certain playstyle and they are consistent every match, and others are just as volatile as you are.
Being a caster and a basher is very different as the techniques and strategies change.
Any abbreviations or terms you find below that you are unfamiliar with can be found in the Terms & Abbreviations section.
The following tactics are for casters:
-
Keep an eye on the bashers, they
can rush you at any moment and kill
you or lock down your team with wffs.
This is very important to survival.
It won't take long for casters to spell
you after you're unable to move or cast.
Shown to the right: -
Mixing up your use of mor dion with dion and
stone skin is a good way to confuse bashers
due to their duration difference while having
the same animation and sound. -
Pay attention to the curse your opponents put on themselves before and during the match, using the correct ao spell on the first try can save you a lot of time.
-
Never dion at the beginning of the duel, it prevents your teammates from ao'ing you. You should only dion if you feel that you are about to die. For example, if you are already spelled (cursed), and an enemy basher could pose
a threat. -
Ao your basher frequently, spam assail ((space bar)) even if they aren't prahmed or wff'd yet, this ensures your basher gets ao'd constantly.
-
Keep yourself bc'd or cradhed, this prevents enemy casters from cursing you quickly and forces the enemy to ao your curse before trying to cast a greater curse on you.
-
While you are prahmed or wff'd, if you feel you are about to die, constantly cast heals on yourself. This is called healing out and works effectively against full combos. Healing out will not work against a cheap combo, as a cheap combo ends with kelberoth strike and it is not possible to heal out of unless your health hits zero before kelberoth strike is used. Shown below:
The following tactics are for bashers:
-
A foreign chant ((macro programs)) will help you use abilities quickly. There are plenty of foreign chants you can use to assist you. Creating multiple combos is important. You should have at least a full combo and a cheap, but some other combos can get complex such as removing shields to use certain skills and changing necklaces to make sure you maximize your damage against unknown defenses.
-
Some players make bashing a little more difficult by using Hy-brasyl belts. These belts do not allow you to immediately tell their defense without a rogue. A necklace swapping combo is useful for battling against these players as it will use both light and dark attacks against their defense rapidly. There are five different element belts that look the same and the no element one as shown below:

-
Assail your caster even when they're not prahmed or wff'd, as the delay time between prahm and your assail hitting can make a difference. Constantly hitting your caster can save you from both becoming immobile.
-
Moving toward your enemy will cause them to panic, they may move or dion when trying to escape you. If they move, you should return to your caster, however, if they dion, a quick wff will lock them while your caster gets them ready.
-
Focusing on the main damage dealers is usually the goal. The players that are able to deal fatal damage should be killed first to prevent your team from losing.
-
Using abilities that alter your health before dying is a good way to live. Kelberoth strike, Spinning Kelberoth Strike, Crasher, and Animal Feast can keep you from dying and deal damage to your enemy. This is known as kelbing or crashering out (out of death). Shown below:
-
Drinking or eating things that alter your health can also save your life, this is known as iteming out. This can be done with hemlochs, rambutans, or even tonics from Andor. Iteming out does not require a target and is easier than using an ability to save your life. Shown below:
-
If your caster is prahmed and dioned, it is a good idea to use wff on them. This will allow your caster to be ao'd before dion runs or prahm, and continue to cast without being able to be prahmed or wff'd again for a short period of time. Shown below:
Terms & Abbreviations
Strategies depend on your opponents. Some rush, some stay back, some like to pretend they're coming for you and retreating. Just by predicting what your enemy's intentions are ahead of time can prevent you from being killed.
Keep in mind to protect your high health or popular team members, as the enemy may focus them first. You could prepare to defend that player or even focus the players that are focusing that high teammate, making the enemy easier to target. Use this knowledge to your advantage.
There are many terms and abbreviations used by different players, below is a simple list of the most common.
-
AIC/MIC - Ard ioc colhma and mor ioc colhma, frequently used to keep your groups alive during battles. Spamming of these spells make the arena difficult for the enemy and can be a deciding factor on who wins the war.
-
AITE - A protection spell, halving the amount of damage incoming.
-
AO/HIT - The player is immobile and needs to take any form of damage to be able to move again. Assail as well as any damaging skill or spell will "ao" your target, except Kelberoth Strike or any similar skill. Only ao targets that are on your team!
-
ARD/DS1/DS2/DS3 - Ard cradh, dark seal, darker seal, and demise, respectively. These are stronger curses placed on enemy players to boost the amount of damage they take by raising their AC. Below are the properties of each spell.
-
Ard Cradh - Increase AC (armor class) by 65 and decrease MR (magic resistance) by 30%
-
Dark Seal - Increase AC by 70 and decrease MR by 30%
-
Darker Seal - Increase AC by 85 and decrease MR by 40%
-
Demise - Increase AC by 95 and decrease MR by 40%
-
-
BAIT/BAITED/B8 - Usually an insult, claiming to have killed you or an ally with the Kelberoth Strike (a skill that deals %30 of the players' health as damage through the target's dion.)
-
BC - Beag cradh, this spell blocks other curses from being cast on you or an ally. Keeping yourself bc'd is a great strategy to keep yourself from being killed quickly. Players usually ask for bc by saying bc out loud.
-
BF - Beag fas, this spell blocks other fas spells from being cast on you or an ally. Fas multiplies the damage dealt to you, using beag fas can play a major role in the coliseum arena. (Fas is not allowed in hosted battles.)
-
CC - Crowd control, this means wolf fang fist, prahm, or even beag suian players to keep them from moving, attacking, or casting. A good plan to have cc in smaller battles, it is a bit more difficult in bigger battles.
-
CHEAP - For Priest/Monk or Priest/Warrior classes, a cheap would contain the skill Transferblood, before kelbing. However, in every other basher class, it is simply to use all your skills except for crasher. Usually, wff and kelberoth strike are last to prevent item outs or kelb outs.
-
DION/D1 - D1 is usually the slot most Aislings keep their dion spell in, if you press d it will bring you to your spell pane, and the number 1 is referring to the slot dion is in. This is used as a taunt to tell you to dion.
-
END WFF - Use your full combo, but cast wolf fang fist last so the target is asleep after your combo, usually used on players with higher health or players who are capable of iteming out (this is further explained below).
-
FLOWER/F - F is an abbreviation for flower in some circumstances, players may run out of mana and request flower (Lyliac plant). Summoners have the ability to pass their mana to another player. This spell is called Lyliac Plant, also known as flower.
-
FULL COMBO - Every skill you have in a certain order to ensure maximum damage. Usually consists of kelberoth strikes first, followed by a crasher, then a strong ability, wolf fang fist again (lullaby punch or combo scroll is the same), another crasher, and strong ability to follow, then the rest of your abilities. Before full comboing, it is recommended that you dion.
-
GG - Good game, the player had fun and it was a good fight or battle.
-
HEAL - Naudhaich or ard ioc is single target heals, generally when someone says heal they are asking for you to cast naudhaich or ard ioc on them. Usually after being attacked or full comboing someone.
-
ITEM OUT - Items that change your health, such as Rambutans, tonics, or hemlochs can be used to save your life. Similar to the skills below, when your health hits zero, these items can increase your health from zero.
- KELB/DK/TK/QK - Kelberoth strike, depending on the situation someone may be asking you to use this ability on an enemy, depending on the number of times, you are double kelbing (dk), triple kelbing (tk), or quad kelbing (qk). It doesn't stop there, but it's an odd situation if the target lives a quad kelb.
- KELB/CRASHER OUT - Abilities that change your health can also save your life. Kelb, crasher, and auto hemloch all change your hp, so if you were to hit zero hp, using these abilities on a target fast enough could keep you alive.
- KOS - Kill on sight, usually used as a threat that you will be killed anytime you are in the arena.
- MDC - Mor dion colhma, a group mor dion spell casted by priest. This can hurt and help your team, allowing your team to be fully protected but you will be unable to ao teammates if they are prahmed or wff'd.
- PA - Prevent affliction, this ability prevents players from casting any type of curses, including the weaker ones. This can stop a caster in their tracks for a long period of time.
-
PC - Pravat Cave.
-
SPELLED/READY - The player is cursed (ard/ds1/ds2/ds3 and fassed (if allowed), maximizing your damage on that target.
-
SOUTH - Referring to Arena zone South, the most popular location for pvp.
-
WFF - Wolf fang fist, a skill that monks learn after mastering the red dugon. This skill does a very minuscule, almost unnoticeable amount of damage and puts the target to sleep just like the spell pramh does. Gladiators are able to learn a similar skill at ability 50 known as lullaby punch, which functions identically to wolf fang fist.
-
WFF DUEL - A duel that does not consist of dying, instead your goal is to accurately hit someone with the skill wff. This takes some time getting used to and can be a bit tricky. Practice makes perfect.
-
WFF LOCK - High health players, mainly casters that are confident and difficult to kill, can be rendered useless if they are wolf fang fist locked. Players that dion cannot be ao'd, wff'ing them will keep them from doing anything for the full duration of wff or until their dion runs.


Arena Memories
Credits
makiz - page layout, some sprites and background
eiscego - some gifs
zera - memories
iglis - proof-reading and editing
Thank you all for your contributions.